정체는 어떻게 일어날까? 어느 날 갑자기가 아닌, 근비대가 멈추기까지의 과정
정체는 근육이 갑자기 반응하지 않는 현상이 아닙니다. 과거에 충분했던 자극에 몸이 적응하고, 부하 진전이 둔화되는 한편 피로와 회복의 제약이 쌓이면서 '자극을 업데이트하지 못한 상태'가 수주간 지속한 결과로 드러나는 것입니다.
사용 무게가 1회 증가하지 못한 것만으로는 정체가 아닙니다. 근비대 자체의 둔화와 피로로 발휘 능력이 가려진 겉보기 정체를 구분하면, 일어나는 과정을 더 명확히 추적할 수 있습니다.
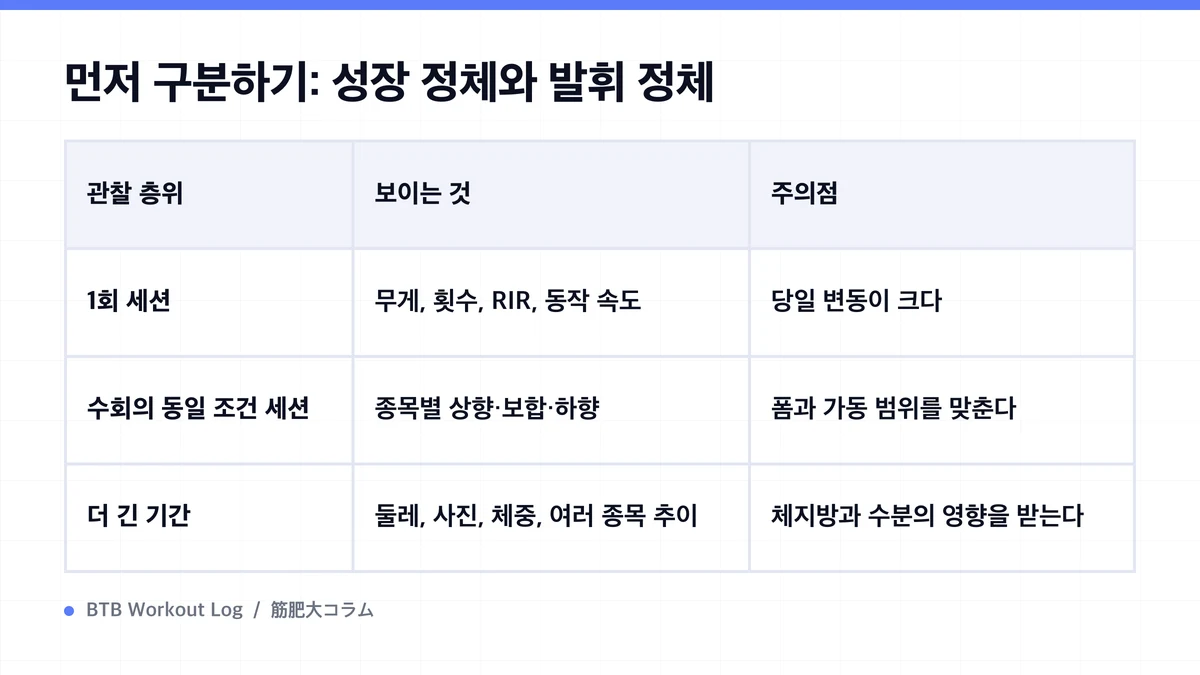
먼저 구분하기: 성장 정체와 발휘 정체
'벤치프레스가 지난번보다 1회 적었다'와 '대흉근이 장기간 증가하지 않았다'는 같은 현상이 아닙니다. 전자는 수면, 영양 섭취, 시간대, 세트 간 휴식, 측정 오차 등으로 날마다 변하는 발휘 능력입니다. 후자는 근량 변화이며 훨씬 긴 시간축으로 판단해야 합니다.
| 관찰 층위 | 보이는 것 | 주의점 |
|---|---|---|
| 1회 세션 | 무게, 횟수, RIR, 동작 속도 | 당일 변동이 크다 |
| 수회의 동일 조건 세션 | 종목별 상향·보합·하향 | 폼과 가동 범위를 맞춘다 |
| 더 긴 기간 | 둘레, 사진, 체중, 여러 종목 추이 | 체지방과 수분의 영향을 받는다 |
따라서 정체는 단발성 개인 기록 실패가 아니라 비교 가능한 조건에서 여러 지표가 상향하지 않는 상태로 봅니다. 한 종목만 멈추고 같은 근군의 다른 종목이나 횟수가 증가하면 근비대가 아닌 기술이나 종목 특이적 정체일 수 있습니다. 무게·횟수·RIR 추이를 기록하는 의미는 기록으로 정체를 인식하는 메커니즘에서도 정리하고 있습니다.
1단계: 과거와 동일한 처방의 상대적 자극이 약해진다
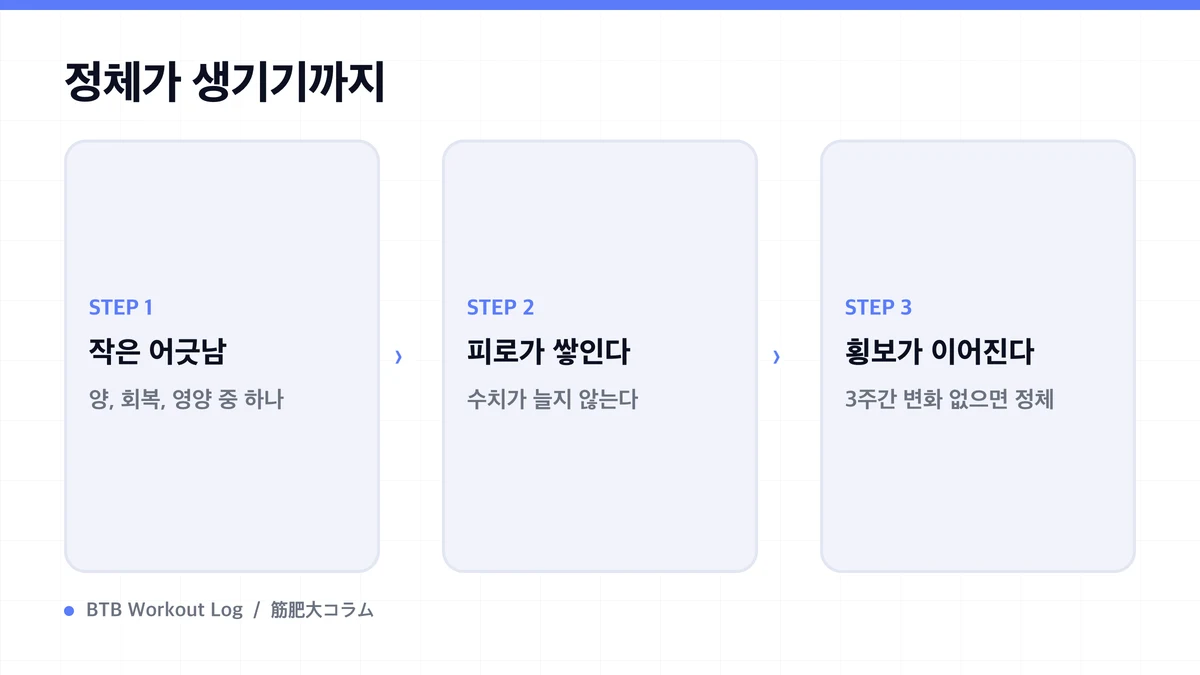
훈련 초기에는 특정 무게와 세트 수가 몸에 새롭고 충분히 큰 요구가 됩니다. 계속하면서 근력, 동작 기술, 세트 간 회복력이 개선되면 같은 처방을 이전보다 여유 있게 수행할 수 있게 됩니다. 이는 성장의 증거이지만 동시에 다음 정체의 입구이기도 합니다.
예를 들어 80kg을 10회 수행했을 때, 초기에는 RIR1, 즉 '추가로 1회 할 수 있는 여력'이었는데 수주일 후에는 RIR3이 되었다고 합시다. 외부에 보이는 무게와 횟수는 같아도 몸에 대한 상대적 난이도는 낮아졌습니다. 그대로 유지하면 각 세트에서 요구되는 발휘가 작아지고 주 전체로 쌓이는 자극도 증가하지 않습니다.
여기서 필요한 것이 점진적 과부하입니다. 매번 무게를 더한다는 뜻이 아니라 목표한 폼과 가동 범위를 유지하면서 횟수, 무게, 세트 수, 빈도 등을 회복 가능한 범위에서 진행시킵니다. 몸이 적응하는 속도보다 처방 업데이트가 느리면 적응한다 → 같은 자극이 상대적으로 약해진다 → 새로운 적응을 유도하기 어려워진다는 순으로 성장곡선이 완만해집니다.
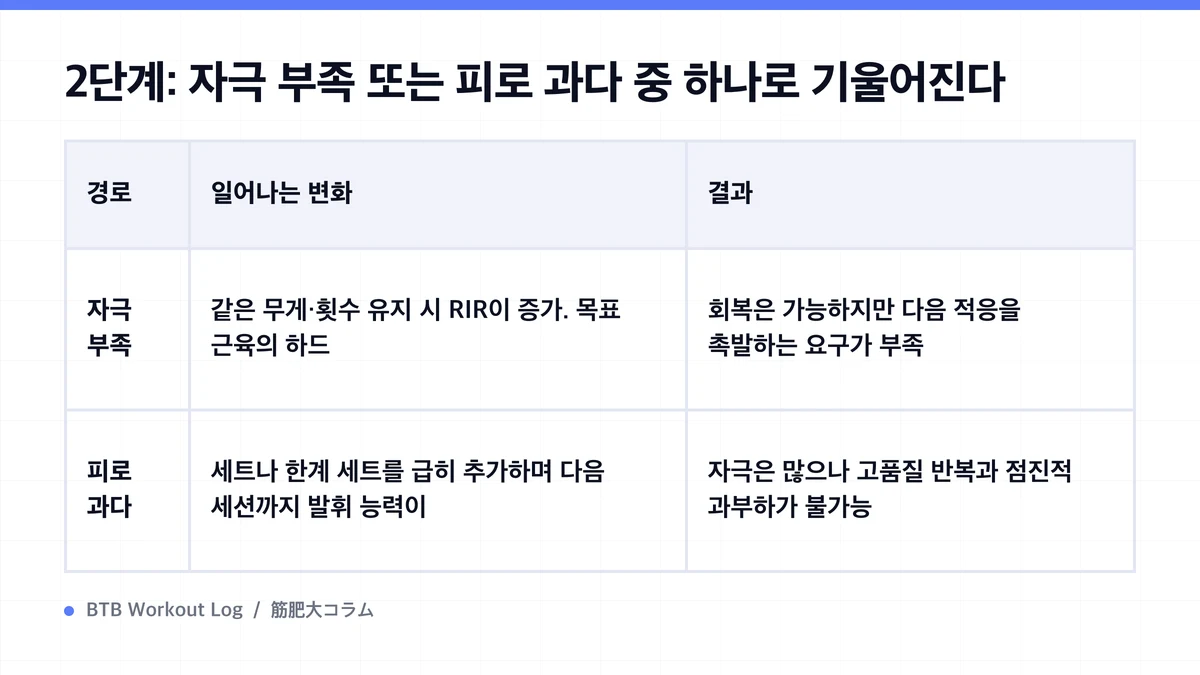
2단계: 자극 부족 또는 피로 과다 중 하나로 기울어진다
처방 업데이트가 어려워진 후 정체까지의 경로는 크게 두 가지로 갈립니다. 겉으로는 둘 다 '무게나 횟수가 안 늘어난다'이지만 대응 방법은 정반대입니다.
| 경로 | 일어나는 변화 | 결과 |
|---|---|---|
| 자극 부족 | 같은 무게·횟수 유지 시 RIR이 증가. 목표 근육의 하드 세트도 증가하지 않음 | 회복은 가능하지만 다음 적응을 촉발하는 요구가 부족 |
| 피로 과다 | 세트나 한계 세트를 급히 추가하며 다음 세션까지 발휘 능력이 회복되지 않음 | 자극은 많으나 고품질 반복과 점진적 과부하가 불가능 |
자극 부족 쪽에서는 편해진 처방을 업데이트하지 않아 근육에 대한 새로운 요구가 작아집니다. 피로 과다 쪽에서는 정체를 두려워하며 보륨을 과하게 늘리거나 매 세트를 한계까지 수행해 다음 세션의 무게·횟수가 떨어집니다. 한계까지 몇 회 더 할 수 있는지를 나타내는 RIR이 매번 0에 가깝고 여러 종목 성적이 하락하면 자극 부족보다 회복 지연을 의심할 시점입니다. 한계까지의 몰아붙임은 사용할 수 있는 수단이지만 모든 세트에서 필수는 아닙니다.
수면, 에너지 섭취, 심리적 스트레스도 이 분기를 움직입니다. 같은 메뉴라도 회복 여력이 줄면 피로 과다 쪽으로 기울고, 반대로 세트 수가 많아도 여력 큰 반복만 있으면 자극 부족이 될 수 있습니다. 더욱이 주요 종목의 품질이 떨어지는데 저품질 세트만 증가하면 두 경로가 동시에 발생합니다. 노력량이 많은 것과 성장을 촉발하는 자극을 업데이트하는 것은 별개입니다.
Stage 3: Chasing progress breaks your comparison baseline, locking in the plateau
The moment weight stops moving, you want to change everything at once—the lift, your form, your 가동 범위, your 렙 범위, your set count. But flip your variables every session and you can't tell if you actually got stronger, just shortened your range, or just recovered better. Without clear data, you pick the wrong fix—usually the opposite of what you need.
The classic trap: weight stalls → add sets → fatigue tanks your reps → think you're under-stimulated and push harder. Or the other way: switch exercises constantly over small dips, never building skill or accumulating volume on any one lift. Chase the number alone and you'll widen your range of motion, add bounce—you'll hit a new PR without actually loading the target muscle the same way. That false progress leads straight to why weight alone doesn't prove you're making gains.
What gets locked in at this stage isn't your body's growth ceiling—it's confusion about whether you're under-stimulated or over-fatigued. Without comparable records, each tweak buries the real cause deeper. The same mistake repeats.
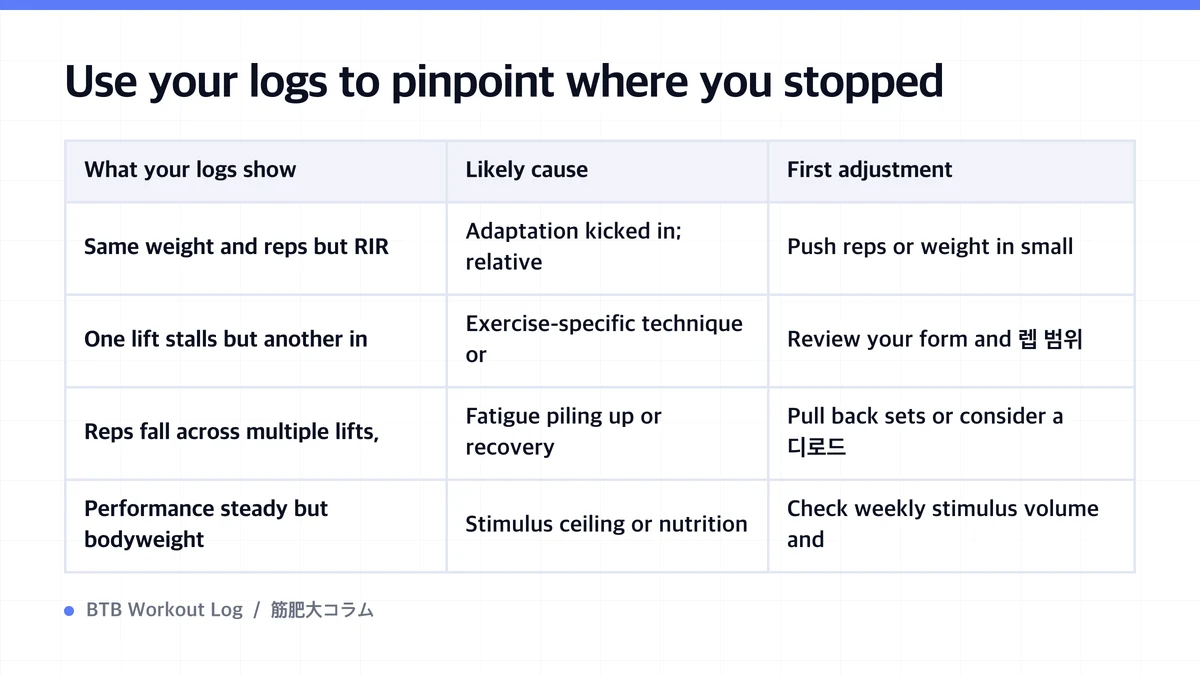
Use your logs to pinpoint where you stopped progressing
The first move out of a plateau isn't more volume—it's a hypothesis about where the chain broke. Compare your recent sessions on the same lift: line up weight, reps, RIR, 가동 범위, rest intervals, and what ended the set.
| What your logs show | Likely cause | First adjustment |
|---|---|---|
| Same weight and reps but RIR climbed | Adaptation kicked in; relative stimulus dropped | Push reps or weight in small increments |
| One lift stalls but another in the same muscle group moves | Exercise-specific technique or load setup issue | Review your form and 렙 범위 |
| Reps fall across multiple lifts, RIR tanks too | Fatigue piling up or recovery margin shrinking | Pull back sets or consider a 디로드 |
| Performance steady but bodyweight and circumference stalled long-term | Stimulus ceiling or nutrition shortage | Check weekly stimulus volume and intake separately |
Change one variable at a time. Lock down your comparison baseline first, then scan recent trends and weekly 하드 세트 count per muscle group, then overlay your 회복 status. Stimulus lagging? Nudge reps or weight up small. Too fatigued? Scale the volume back. After the shift, watch several sessions. If the data doesn't match your guess, move to the next factor. Details on picking your next move are in finding the cause and fix for plateaus.
Tracking your workouts won't kill a plateau by itself, but it stops you from mixing up under-stimulation with over-fatigue and gives you proof that one change actually worked. The drift shows up fast when you line up the week-to-week numbers. BTB Workout Log exists to give you that view.
자주 묻는 질문
- How many weeks with no progress before I call it a plateau?
- There's no universal answer. Don't decide after one bad week; compare the same lift multiple times with identical form, 가동 범위, and rest. If weight, reps, and RIR all flatline or drop, and another exercise for the same muscle group also stalls, the plateau call gets stronger.
- If my working weight stops climbing, does my 근비대 stop too?
- Not always. Progress means the same weight for more reps at the same RIR, or moving with better control. Judge by reps, RIR, 가동 범위, and the whole muscle group's trend—plus longer looks at arm circumference or bodyweight—not just one lift's number.
- Should I just add sets as soon as I plateau?
- Only if your logs show 여력 in RIR, 회복 is solid, and your weekly stimulus volume is actually low. If multiple lifts are slipping and you feel beaten down, adding volume will make it worse. Separate stimulus shortage from over-fatigue first, then adjust one factor at a time.
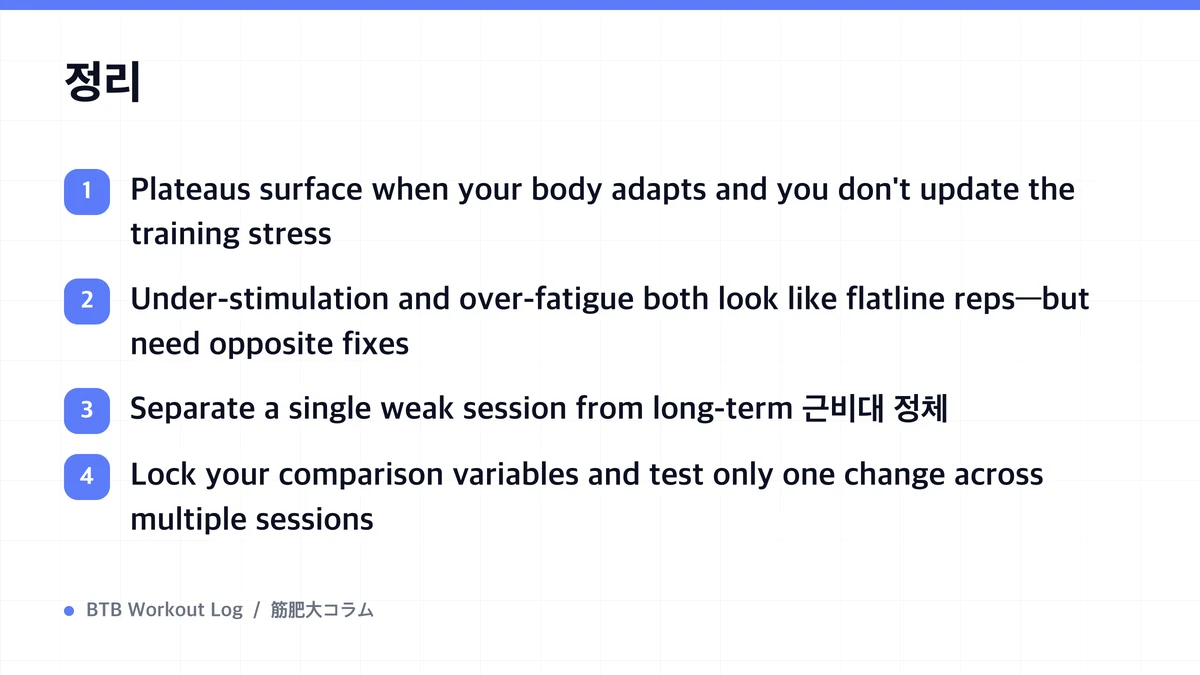
정리
- Plateaus surface when your body adapts and you don't update the training stress
- Under-stimulation and over-fatigue both look like flatline reps—but need opposite fixes
- Separate a single weak session from long-term 근비대 정체
- Lock your comparison variables and test only one change across multiple sessions
참고문헌
- ACSM Position Stand: Progression Models in Resistance Training for Healthy Adults
- Dose-response Relationship Between Weekly Resistance Training Volume and Muscle Mass
- Resistance Training Volume Enhances Muscle Hypertrophy in Trained Men
- Training to Repetition Failure or Non-failure: Systematic Review and Meta-analysis
- Proximity-to-Failure and Muscle Hypertrophy: Systematic Review with Meta-analysis