What Is RIR? Use Reps in Reserve to Manage Intensity and Make Better Gains
RIR is a measure of how many more reps with the same form you could have done at the moment you ended a set. For hypertrophy, putting most of your working sets at RIR 1-3 makes it easier to balance enough effort against recovery.
RIR 0 is the state where you cannot complete even 1 more rep, and RIR 2 is the state where you could do 2 more. It is not a choice between going to failure on every set and leaving a large reserve; you use it to reproduce a stopping point that suits the exercise and the position of the set.
What RIR means (and how it differs from RPE)
RIR stands for Reps In Reserve, and it estimates your remaining rep capacity as a number of reps. RIR 2 means you could have completed 2 more reps holding the intended form and range of motion, but you stopped the set there. If you stopped because of pain, breathlessness, or an unstable setup, that cannot simply be treated as the RIR of the target muscle.
The closely related RPE expresses the subjective intensity of a whole set on a 10-point scale. In the mapping commonly used in strength training, RPE 10 corresponds to RIR 0, RPE 9 to RIR 1, and RPE 8 to RIR 2. That said, there is no need to convert decimals or the high-reserve range with any precision. If "how many more reps" is easier for you to judge, use RIR; if your team or program is standardized on RPE, RPE is enough.
What RIR deals with is not the external weight but the rep capacity remaining at that weight. Even on a set of 100kg for 5 reps, the effort is different at RIR 5 than at RIR 1. Conversely, even when the weight differs, matching the exercise, the movement conditions, and RIR makes it easier to compare against last time.
RIR and intensity reference table
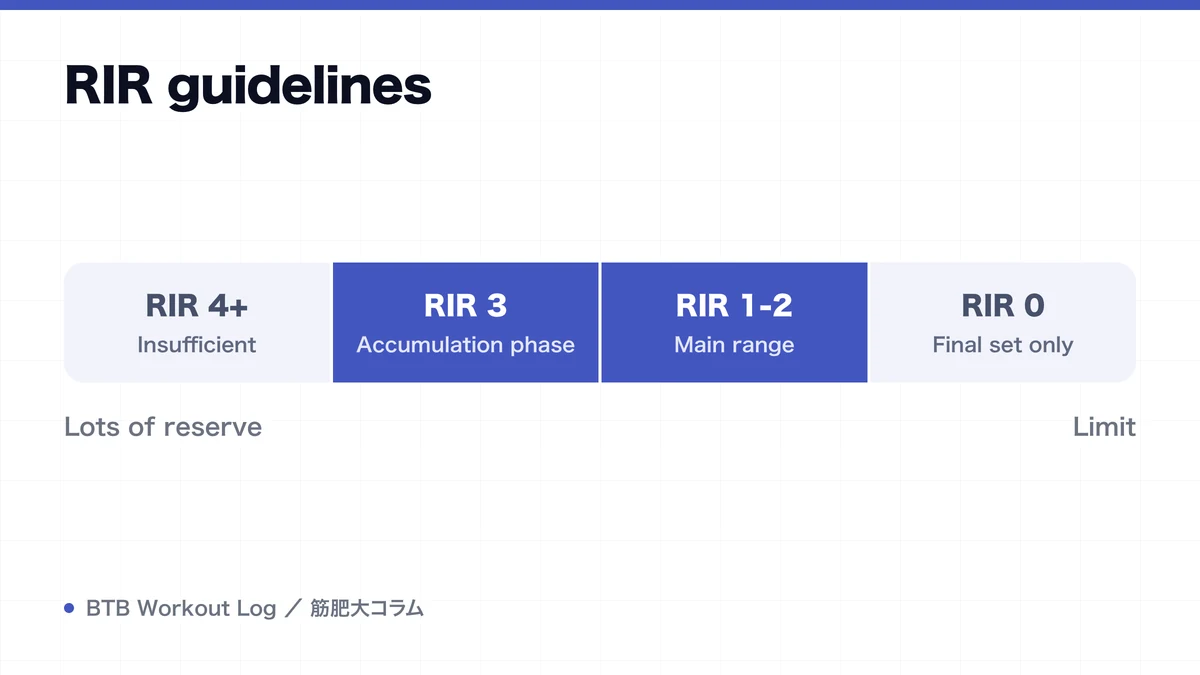
| RIR | State | Where to use it |
|---|---|---|
| 0 | Failure (not even 1 more rep) | Last set of safe exercises only |
| 1-2 | 1-2 reps left | The main zone for hypertrophy |
| 3 | 3 reps left | Main lifts, accumulation phases |
| 4+ | A large reserve left | Warm-ups, or not enough stimulus |
This table is a rough guide for day-to-day use. RIR 0-3 is easy to apply to hypertrophy sets, and centering on RIR 1-3 makes it easier to get close enough to failure while keeping output for the sets that follow. RIR 4 and above still has a role in warm-ups, technique practice, and weeks where you hold fatigue down, so there is no need to discard all of it as insufficient stimulus.
Even at the same RIR 2, squats and lateral raises, or 5 reps and 20 reps, differ in how easy the estimate is and in how much fatigue they create. At high reps it is easy to mistake burning or hard breathing for being unable to continue, and at heavy loads the reps left change depending on whether you allow slight form breakdown. Decide on a standard for a completed rep on each exercise before you log it.
How stimulus and fatigue change as RIR gets smaller
The process by which RIR changes the stimulus is not a story about a hypertrophy switch flipping the moment it reaches 0. As you continue a set and RIR gets smaller, the muscle fibers already working fatigue, and additional motor units join in to keep producing the required force. Rep speed also drops, and there are more phases in which the active muscle fibers carry high tension.
On the other hand, the closer you get to failure, the more not only the stimulus but also local fatigue, movement breakdown, and psychological cost increase. Moving from RIR 3 toward RIR 1 and moving from RIR 1 toward a failed rep do not necessarily add hypertrophy in the same proportion. What matters is not the fact that you missed the last 1 rep, but how many close-enough sets you can repeat at high quality across the week.
Also, an RIR 0 where your grip or your breathing gave out rather than the target muscle is not necessarily RIR 0 for the target muscle. RIR is not a score for how hard a set hurt but an estimate of how many more reps of the movement you defined you could do. Logging a short reason for stopping makes it harder to misread what the same number means.
Why you do not need to go to failure on every set
How to push to failure makes it easy to confirm that you reached a high enough effort, and it also has a use in learning what a reserve feels like. But rep failure is not a special boundary where hypertrophy begins. The reason to stop just short of failure is that it makes it easier to keep output for the following sets and the next session without losing much stimulus.
Across the research as a whole, you cannot say that going to failure is clearly better for hypertrophy than not going to failure. You also have to account for the fact that the RIR at which sets were stopped is not consistent across studies, and that the subjects, loads, and exercises differ. Rather than "RIR 1-3 is always the same", treat it as a practical starting point for managing a large number of working sets.
The idea that the more sets to failure, the more growth overlooks the added cost of that last rep. If taking set 1 to RIR 0 makes the reps and form on sets 2-4 drop sharply, you should evaluate the sense of achievement from a single set separately from the stimulus across the whole week.
Allocating RIR 1-3 and failure sets exercise by exercise
Comparing failure sets with RIR management does not pick a winner on average hypertrophy alone; it also takes in safety, the following sets, and the need for calibration. Main lifts and free weights carry a heavy cost in form breakdown and in getting out of the movement when you fail, so starting from RIR 2-3 is likely easier to handle. On stable machines and isolation exercises, it is easier to push some of the later sets toward RIR 0-1.
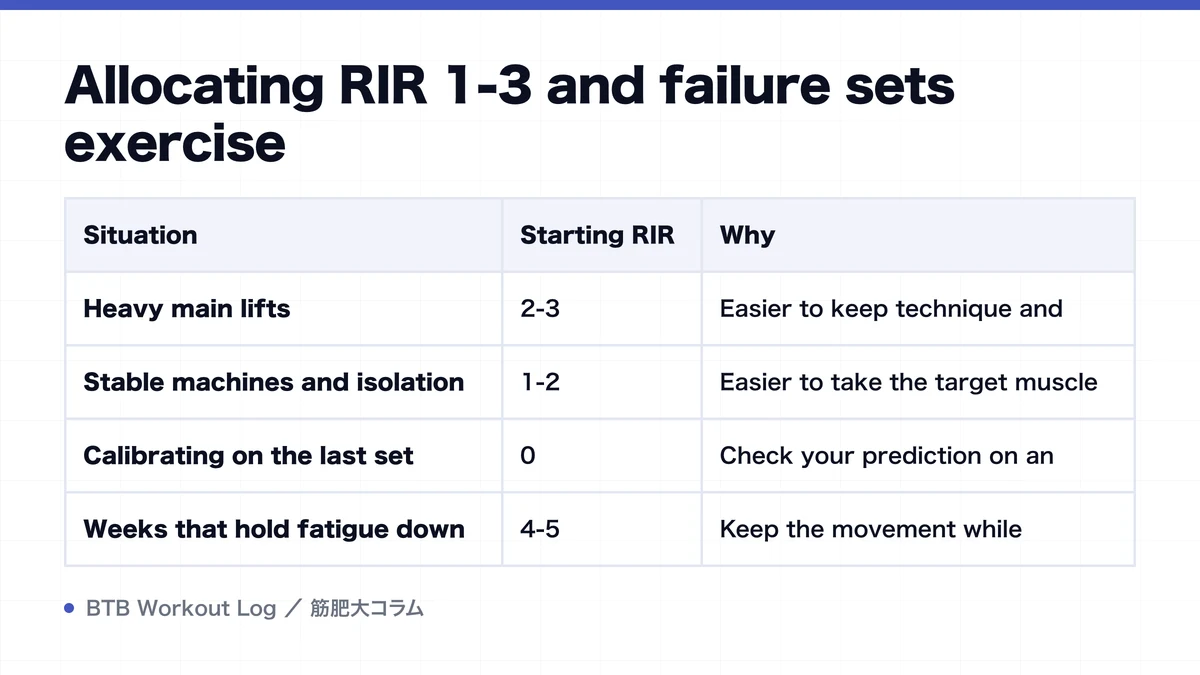
| Situation | Starting RIR | Why |
|---|---|---|
| Heavy main lifts | 2-3 | Easier to keep technique and output on the following sets |
| Stable machines and isolation | 1-2 | Easier to take the target muscle close, and safe to end |
| Calibrating on the last set | 0 | Check your prediction on an exercise you can do safely |
| Weeks that hold fatigue down | 4-5 | Keep the movement while prioritizing recovery |
You also do not need to put every set at the same RIR. If you bring 3 sets closer with RIR 3, 2, and 1, for example, you can keep output early on while reaching a high enough effort later. Conversely, if you tend to overestimate your reserve at light loads, rather than routinely using the test of taking every set to failure, check the gap against your prediction on a safe last set only.
A calibration routine for sharpening your RIR judgment
RIR is an estimate rather than a measured value, so it does not have to be accurate from the start. What matters is logging it with the same definition, checking it against reality now and then, and learning which direction your error runs.
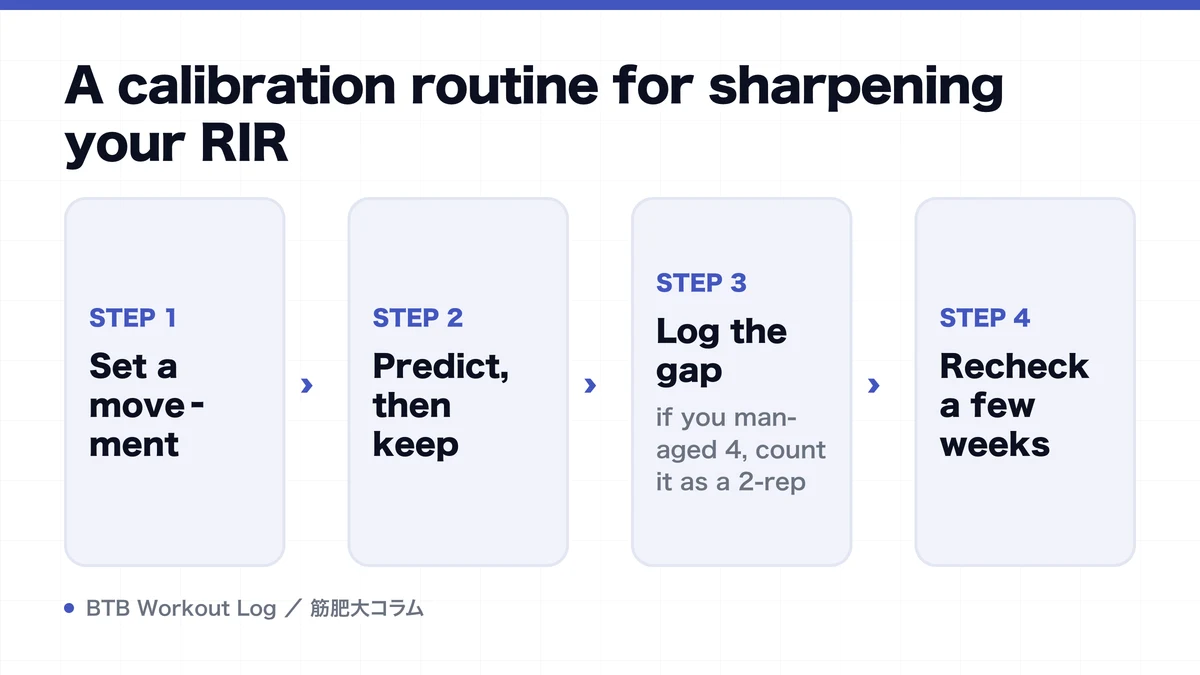
- Set a movement standard: fix your range of motion, momentum, and tempo, and do not count reps outside that standard toward your reps left.
- Predict, then keep going: on the last set of a safe exercise, predict "RIR 2" and check how many more reps you can actually do.
- Log the gap: if you managed 4, count it as a 2-rep underestimate, and if 1, a 1-rep overestimate, and keep a record of your bias on each exercise.
- Recheck a few weeks later: do not go to failure every time, and calibrate only when your load range or technique has changed.
A clear drop in bar speed is a clue that you are close to failure, but speed alone does not pin down your reps left. That is because the relationship changes with the exercise, the load, fatigue, and how stubbornly the lifter grinds. On squats and bench presses, where you cannot fail safely, learn the feel on machines and isolation exercises and start from a conservative setting.
Using RIR to reread the same 10 reps and how much you felt it
Two sets of 10 reps can provide different stimuli because 10 only tells you when you stopped. If you previously lifted 80kg for 10 reps at RIR2 and now manage 11 reps at RIR2 under the same conditions, your rep capacity may have improved. But if those 11 reps now take you to RIR0, some of that extra rep may simply reflect pushing closer to failure.
Feeling the target muscle working is another useful clue. A strong burn or pump does not necessarily mean a high-quality hard set if you stop at RIR5 or start using more momentum. Conversely, an exercise can be a strong choice even without much sensation if your technique stays consistent, you match RIR across sessions, and your load or reps increase.
Assess progress over several weeks. Prioritize progressive overload over how hard a session felt, comparing load, reps, RIR, range of motion, and rest under conditions that are as consistent as possible. Recording RIR also helps you spot progress when your rep count stalls: you may be achieving the same performance with more reps in reserve. BTB Workout Log records load and reps for each set and lets you review your history by exercise. Add a note such as "RIR2" to that day's exercise notes to give yourself a reference when comparing sessions.
Building RIR into your program and your load adjustments on the day
Write a target RIR into the program, and on the day choose a weight that lands in that range. In an accumulation phase, secure volume around RIR 2-3, and in a phase where you raise intensity, bring part of the work closer to RIR 0-2. If you use the established approach of cruising lightly at RIR 4-5 in a week that sheds fatigue, you can manage effort week by week on the same scale rather than in words alone.
Even when the warm-up feels heavy on the day, you do not need to break your form to stick to the planned weight. If on the first work set you fall short of the lower end of the target reps and your RIR is smaller than planned, drop the load slightly. If you reach the upper end of the rep range while your RIR stays large several times in a row, that is a candidate for adding weight next time.
RIR is not a fully objective value, but being subjective does not make it worthless. By fixing the movement conditions, calibrating the error on each exercise, and looking through to the following sets and your next session's performance, it becomes a practical metric you can use to adjust both insufficient effort and excess fatigue.
FAQ
- Can beginners use RIR?
- You can, but at first prioritize a consistent definition over accuracy. If on the last set of a safe machine or isolation exercise you occasionally predict and then continue to failure, and log the gap against the actual reps left, you will learn your bias on each exercise.
- Should I use RIR or RPE?
- Either is fine. RIR 2 and RPE 8, RIR 1 and RPE 9, and RIR 0 and RPE 10 are the common correspondences. If "how many more reps" is intuitive for you, choose RIR; if your program or coaching environment is standardized on RPE, choose RPE.
- Is it a problem to train at RIR 0 (true failure) every set?
- There is no need to take every set to failure. RIR 0 helps you confirm your effort level, but it can compromise the reps and form of the following sets and your recovery for the next session. Keep most sets at RIR 1-3, and push only some sets of safe exercises toward RIR 0.
- What should you do when your RIR logs vary from session to session?
- First line up your equipment setup, range of motion, rest, and your standard for a completed rep. On top of that, calibrate using a safe exercise, and look at the trend over a few weeks rather than the error on a single day. At high reps, also check whether you are confusing burning or breathlessness with failure.
Key takeaways
- RIR is an effort metric for how many more reps you could do with the same form
- Use RIR 1-3 as the operating starting point for most hypertrophy sets
- Failure sets are not required; use them selectively to calibrate on safe exercises
- Fix your movement standard and sharpen accuracy by checking predictions against the actual reps left
- Track weight, reps, and RIR under the same conditions and adjust load from a few weeks of progress
References
- Repetitions in Reserve Is a Reliable Tool for Prescribing Resistance Training Load
- Estimating Repetitions in Reserve in Common Resistance Exercises
- Exploring the Dose-Response Relationship Between Estimated Resistance Training Proximity to Failure, Strength Gain, and Muscle Hypertrophy: A Series of Meta-Regressions